Color
Fired
Glaze Combinations
Classic Crackles©
Cobblestone
Designer Liner
Elements™ & Elements™ Chunkies
E-Z Stroke® Translucent Underglazes
Flux
Foundations®
French Dimensions™
Fundamentals® Underglazes
Jungle Gems™
Low Fire Clear-Brushing
Low Fire Clear-Dipping
Pottery Cascade™
Product Kits
Raku
Rapid Roll
Snow Gems
Snowfall
Stoneware
Stoneware Clear
Stoneware Engobes
Stoneware Specialty
Stroke & Coat
Speckled Stroke & Coat
Washes
Fired Accessories
Clay Mender
Kiln Wash
Silkscreen Medium
Thin ‘N Shade
Wax Resist
Non-Fired
Bisq-Stain®
Dazzling Metallics®
Magic Metallics™
Matte and Gloss Sealers
Non-Fired Snow
Softees® Pearls
Sparklers™ Brush-On Glitter
Thin ‘N Shade
Ultra Metallics™
Forms
New Forms
Earthenware Bisque
Stoneware Bisque
Tools
Accessories
Brushes
Silkscreens
Communities
Creative Studios
Potters & Hobbyists
Art Educators
Traditional Artists
Artist Features
Projects
Resources
Dinnerware & Food Safety
Health & Safety
Literature and Price Lists
Mayco Product Updates
Ceramic Education
Product Conversions
Product Warranty & Freeze Policies
Safety Data Sheets (SDS)
Certificate of Conformity
Store
Cart
Color
Fired
Glaze Combinations
Classic Crackles©
Cobblestone
Designer Liner
Elements™ & Elements™ Chunkies
E-Z Stroke® Translucent Underglazes
Flux
Foundations®
French Dimensions™
Fundamentals® Underglazes
Jungle Gems™
Low Fire Clear-Brushing
Low Fire Clear-Dipping
Pottery Cascade™
Product Kits
Raku
Rapid Roll
Snow Gems
Snowfall
Stoneware
Stoneware Clear
Stoneware Engobes
Stoneware Specialty
Stroke & Coat®
Speckled Stroke & Coat®
Washes
Fired Accessories
Clay Mender
Kiln Wash
Silkscreen Medium
Thin ‘N Shade
Wax Resist
Non-Fired
Bisq-Stain®
Dazzling Metallics®
Magic Metallics™
Matte and Gloss Sealers
Non-Fired Snow
Sparklers™ Brush-On Glitter
Softees® Pearls
Thin ‘N Shade
Ultra Metallics™
New Colors
Milk Glass
New Colors
Citrus Snow Gem
New Colors
Sparkle Black Engobe
New Colors
2025 Stoneware Glaze Kit (4oz)
New Colors
Papaya
View All New Colors
Forms
New Forms
Earthenware Bisque
Stoneware Bisque
Tools
Accessories
Brushes
Silkscreens
Communities
Creative Studios
Potters & Hobbyists
Art Educators
Traditional Artists
Artist Features
Projects
Resources
Dinnerware & Food Safety
Health & Safety
Literature and Price Lists
Product Updates
Ceramic Education
Product Conversions
Product Warranty & Freeze Policies
Safety Data Sheets (SDS)
Certificate of Conformity
Store
Cart
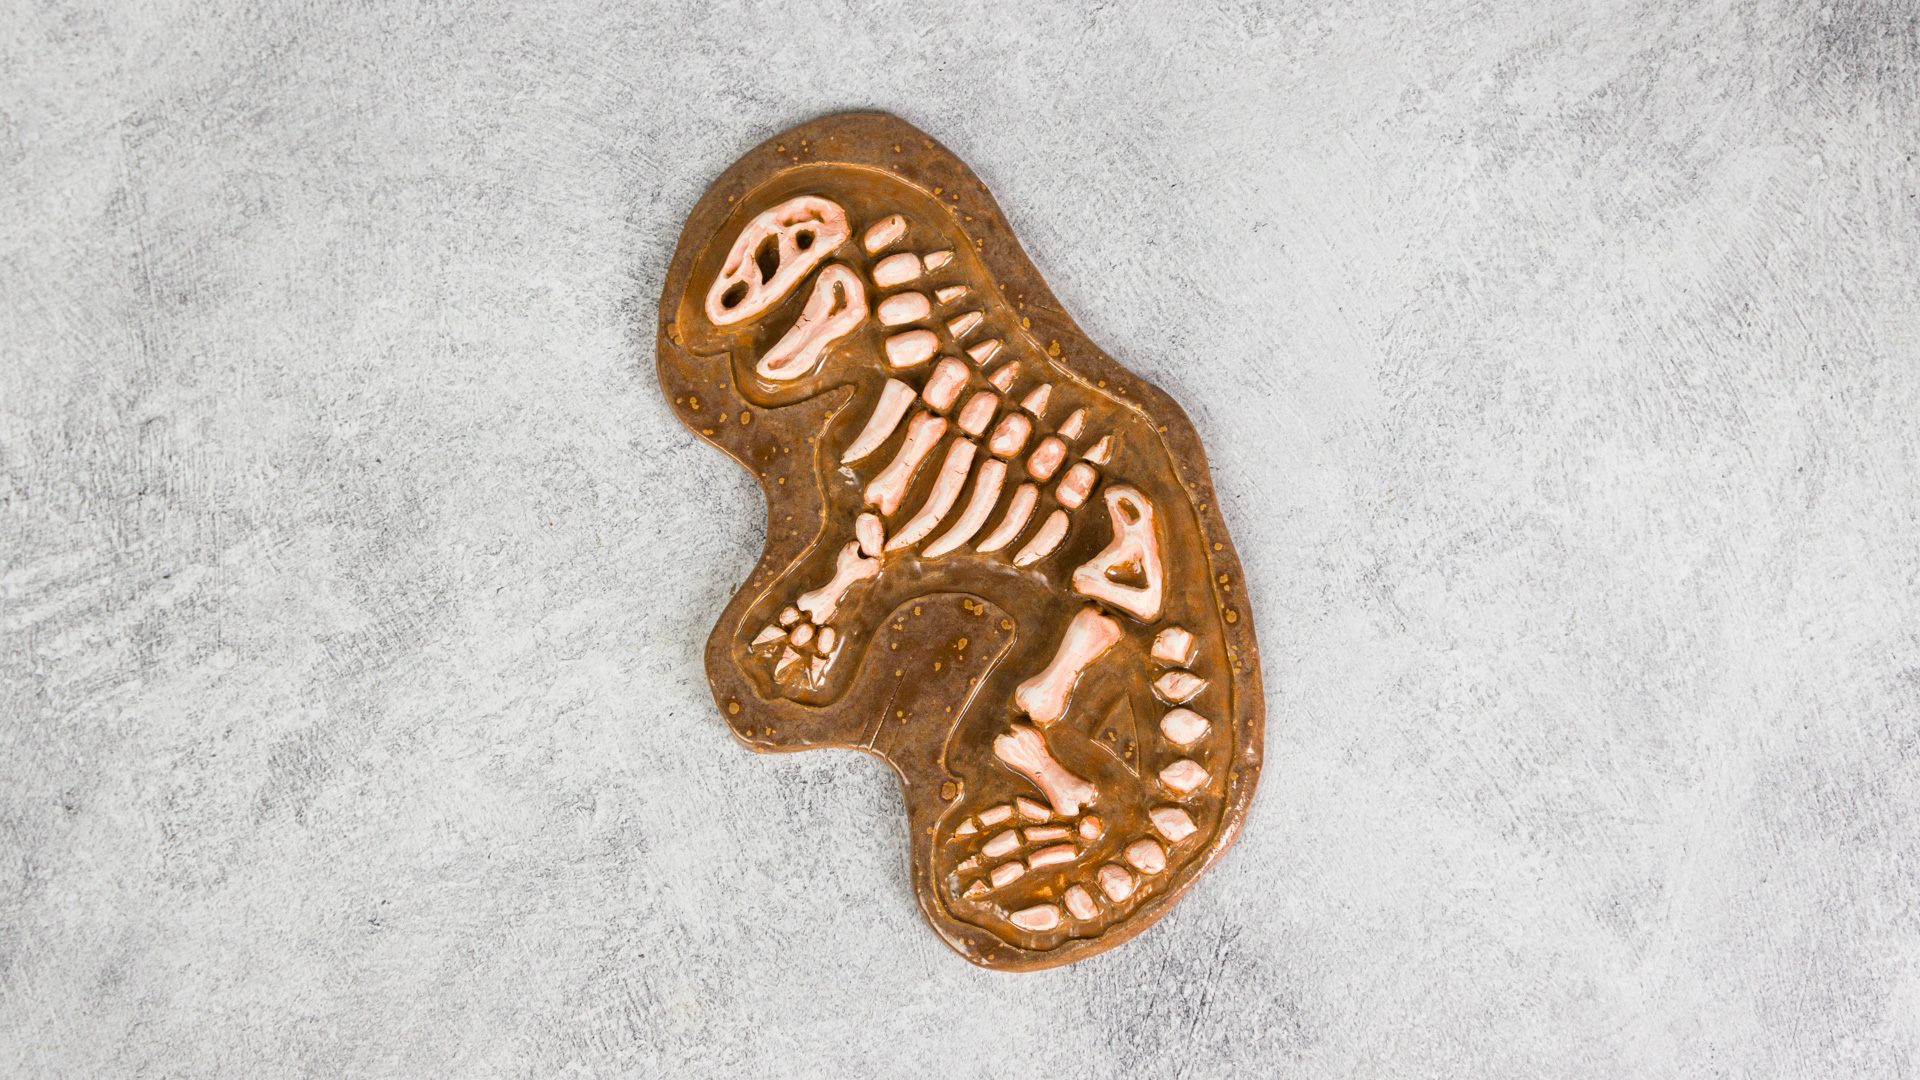
Handbuilt Fossil
Designer:
Bailie Benson
Share
Instructions
Begin with 1.5lbs of low fire clay.
Separate a pound of clay and roll it out flat into an oblong slab.
Compress both sides of the slab with a plastic card.
Using the other half pound of clay, create some basic shapes: balls, ovals, coils, triangles.
Using a photo (or from your own imagination) lay out the basic shapes in the shape of a dinosaur bone fossil.
Mark where the shapes will be reattached with a toothpick and remove the shapes.
Cut the basic shapes in half and manipulate the clay to create a more bone-like shape. (Pinching, smoothing, etc)
Scratch the flat back of the bone and the area of the slab where it will be attached with a toothpick.
Compress the bone to the slab, giving it a wiggle to fully connect the pieces of clay.
Continue steps 8 and 9 until all bone shapes are attached to the slab.
With your carving tool, carve down an indent between the bones and the edge of the slab.
Add texture to the bones and surrounding slab with various texture tools.
Allow to fully dry.
Bisque fire to cone 04.
Remove any dust from properly fired bisque with a damp sponge.
Using a soft fan brush, apply three coats of EL110 to the bones and the inner carved away section of the slab surrounding the bones.
Allow glaze to dry between coats.
Using the script liner brush, apply three coats of EL204 to the outer uncarved area of the slab.
Allow glaze to dry between coats.
Using a damp sponge, wipe off the glaze from the bones. The red iron oxide in the glaze will stain the bones.
Allow to fully dry.
Stilt and fire to cone 06.
Supplies
Form
1.5lbs low fire clay
Colors
EL110 Mudslide
EL204 Glowing Embers
Decorating Accessories
RB144 Soft Fan brush
CB106 Script Liner brush
Miscellaneous Accessories
Sponge
Water
Rolling pin
Plastic card
Carving tools
Toothpick
Similar Projects
Back to Lesson Plan Projects
Top