For the right depth of clay, lay out canvas fabric on table and place 1/4″ slats on the left and right side of the canvas fabric. Place a piece of moist clay about 2 lbs. in size in the middle of the fabric. Using a rolling pin, roll out the clay to the size desired. The slats are used as a guide to keep your clay level and at the same evenness. Make sure the edges of the rolling pin hit the 1/4″ slats.
Using a needle tool cut the shapes as they are on the pattern.
Wrap the two larger pieces of clay around a cylinder. Be sure to wrap paper around the cylinder to avoid having the clay stick to the form. Slip and score the slabs to attach on the back seam of the boot. Let set to firm a bit.
Drape the front section of the boot over a smaller cylinder; slip and score the toe so it is closed.
Take the pieces intended for the bottom of the sole, set them on some canvas, and step on them. Be careful not to step too hard, but just enough to put the texture from the bottom of our shoe onto the piece!
Construct the heel of the boot and attach it to the sole. Then attach this to the front section of the boot.
Once the top section is firm enough to support itself attach it to the rest of the boot.
Next, fit the tongue inside the boot and attach by slipping and scoring at the base and sides. Smooth the front seam with your finger or sponge. Be sure to leave about ¼” of the side pieces in front of the tongue so you can cut out the holes for the laces.
Using a hole cutter cut out the holes for the shoe laces.
Use various sculpting tools to create any small details or texture that you would like the shoe to have.
Let piece slow-dry and once it is in it’s greenware state fire to shelf cone 04.
Glazing:
Begin with properly fired cone 04 bisque. Moisten a clean sponge and wipe bisque to remove any dust.
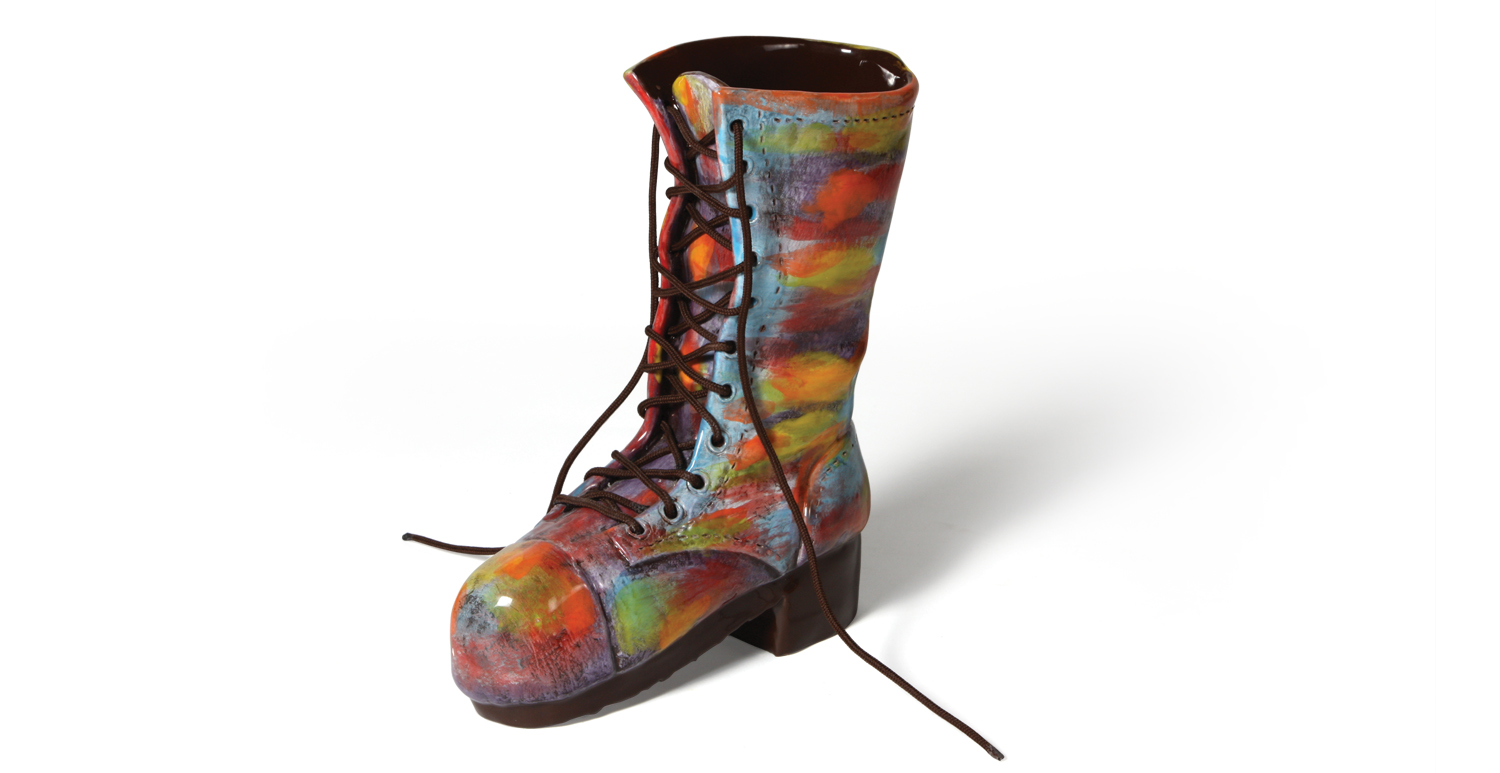
Place some FN-008 Brown into a small cup and add a little bit of water to slightly dilute it (about 3 parts glaze and 1 part water). It should be the consistency of coffee cream. Pour this into the shoe and roll around to completely coat the interior of the shoe. Drain out the excess glaze and keep the piece inverted until it has lost its shine. Wipe off any glaze from the outside using a damp sponge. Allow to dry.
Using a CB-604 #4 Soft Fan, apply 2 coats of FN-008 Brown to the entire outside of the boot.
Once dry, use an AB-834 ¾” Base Coat to dry brush SC-16 Cotton Tail onto the outside of the boot.
Using a CB-604 #4 Soft Fan, apply random brushstrokes of the following Foundation glazes: FN-002 Yellow, FN-003 Orange, FN-004 Red, FN-007 Green, FN-017 Purple, and FN-018 Bright Blue. For the lighter colors you may want to apply to coats to each stroke. Keep in mind the way the light may hit the boot; keeping the deeper colors around areas where there would be shading and the lighter colors around areas that would have highlights.